Consent Mode with Server-Side Tagging: Guide
2/16/2026 • 12 min read

Consent Mode with Server-Side Tagging: Guide
Consent Mode and server-side tagging work together to help you manage user data in a way that complies with GDPR while maintaining measurement accuracy. Here's a quick summary:
- Consent Mode adjusts data collection based on user consent, using parameters like
ad_storageandanalytics_storage. If consent is denied, cookies are not accessed, and only anonymized data is sent. - Server-Side Tagging processes data on a secure server instead of the browser, giving you control over what data is shared with third parties. This setup helps reduce risks like fingerprinting and ensures PII is removed or anonymized.
Key Benefits:
- GDPR Compliance: Ensures data collection aligns with user consent and privacy regulations.
- Data Control: Centralizes data processing, allowing you to validate, anonymize, or block data before sharing.
- Improved Measurement: Supports cookieless tracking and conversion modeling for better insights when consent is denied.
How It Works:
- A Consent Management Platform (CMP) collects user preferences.
- Consent signals (
gcs,gcd) are sent to your server-side container. - Tags like GA4 or Google Ads adjust behavior based on consent states.
Setup Essentials:
- A web and server container in Google Tag Manager.
- A GA4 client in the server container to process consent data.
- A CMP or cookie banner compatible with Consent Mode.
For non-Google tags like Facebook or LinkedIn, you'll need to configure consent parameters manually to ensure they respect user preferences.
Testing is critical: Use GTM Preview mode to verify consent flows and confirm that data is processed correctly. By combining Consent Mode with server-side tagging, you gain control over data handling while staying compliant with privacy laws.
How to Use Consent Mode in the Server Google Tag Manager Container [Step-by-Step Guide]
sbb-itb-641714f
How Consent Mode Works with Server-Side Tagging
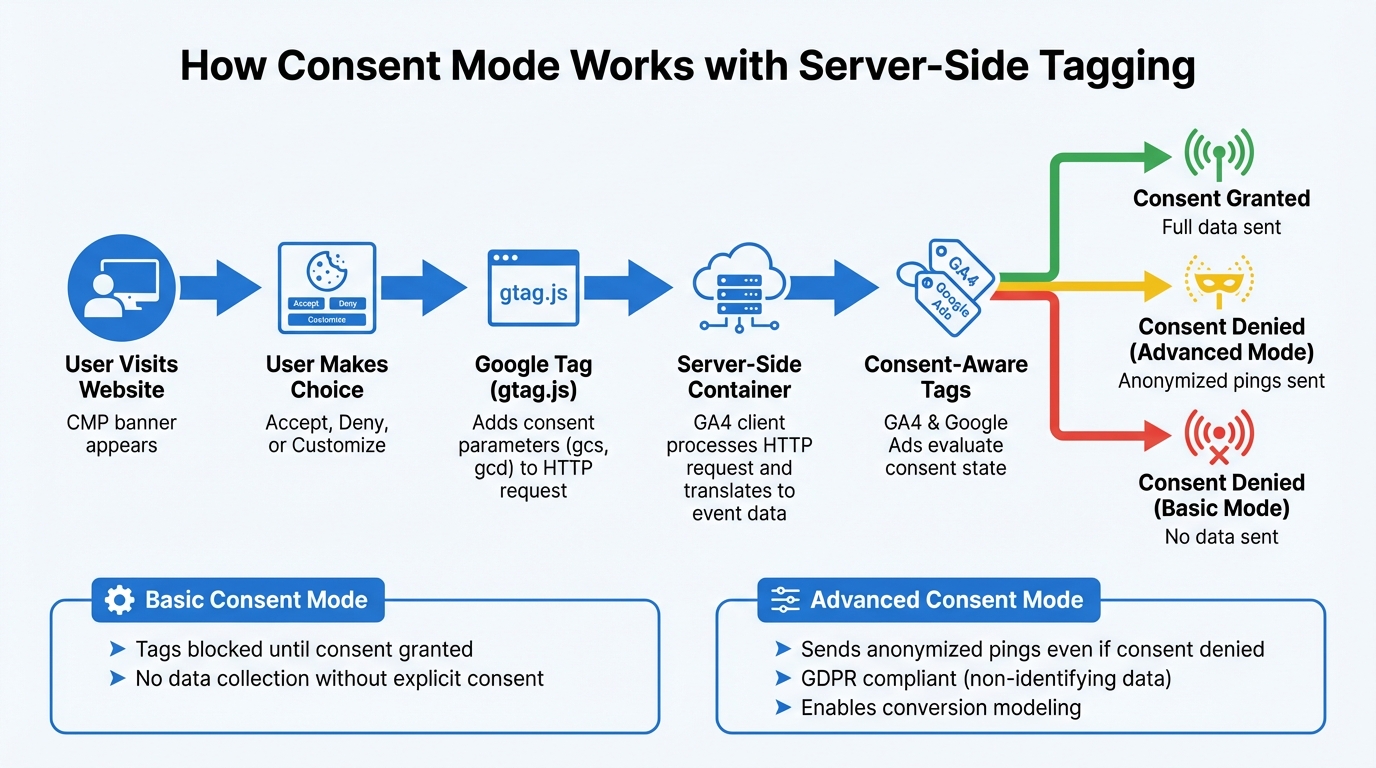
How Consent Mode Works with Server-Side Tagging: Complete Data Flow Process
When users visit your site, they’re presented with a CMP (Consent Management Platform) banner. After making their choice, the Google tag (gtag.js) adds consent parameters - like gcs and gcd - to the HTTP request sent to your server-side container.
Within the server container, a client (commonly the GA4 client) processes this HTTP request and translates it into event data. This data is then accessible to your tags. Consent-aware tags, such as GA4 and Google Ads, automatically evaluate the consent state and adjust their behavior. Depending on the user’s choice, these tags might send full data, anonymized pings, or no data at all.
Basic consent mode ensures that tags are blocked until consent is explicitly granted. Advanced mode, on the other hand, sends anonymized pings even if consent is denied. This setup complies with GDPR by collecting non-identifying data when consent is denied. Google can use these anonymized pings for conversion modeling, provided certain data thresholds are met. This mechanism lays the groundwork for managing detailed parameters, as explained below.
Consent Mode v2 Parameters and Their Role
Consent mode relies on four key parameters to determine what data your tags can collect:
analytics_storage: This controls analytics cookies and identifiers. If denied, no analytics cookies are read or written, and only cookieless pings are sent to GA4.ad_storage: This manages advertising cookies. When denied, no new advertising cookies are created, and IP addresses are used only to determine the user’s country before being deleted.ad_user_data: This governs whether user data can be shared with Google for advertising. Denying this disables ad measurement, personalization, and limits click-ID-based conversion exports.ad_personalization: This parameter controls consent for remarketing. If denied, personalized ad features in platforms like Google Ads and DV360 are turned off.
Additionally, every request includes the gcd parameter, which encodes detailed consent state information, even if consent mode hasn’t been explicitly enabled.
Server-Side Tagging Overview
Server-side tagging offers more than just parameter management - it enhances how data is handled. By processing tags on your server instead of in the browser, you gain centralized control over data before sharing it with third parties. This setup allows you to remove personally identifiable information (PII), validate incoming data, or block certain data points entirely.
For instance:
"Server-side tracking enables companies to improve accuracy, reliability, and data completeness compared to client-side tracking. It reduces dependency on browser-based cookies and scripts, which can often be blocked or limited by users and browsers."
- Tom Wilkinson, Senior Marketing Consultant, Usercentrics
There are also performance perks. With fewer client-side scripts, page load times improve as the processing shifts to the server. Additionally, using a subdomain (e.g., metrics.example.com) places cookies in a first-party context, improving data accuracy and helping to bypass browser restrictions like Safari’s Intelligent Tracking Prevention.
Setting Up Consent Mode with Server-Side Tagging
Prerequisites for Implementation
Before diving into setup, make sure you have administrator access to Google Analytics 4, Google Ads, and your Google Tag Manager (GTM) containers. You'll need both a web container (to capture consent signals from your website) and a server container (to process those signals).
To get started, configure a GA4 client in the server container. This client will handle incoming HTTP requests and extract consent-related parameters. You'll also need a consent management platform (CMP) or a custom cookie banner compatible with Google's consent mode API or gtag.js. Lastly, ensure that your tagging server is up and running - typically hosted on Google Cloud Platform or a similar service.
"To implement consent mode you need: Administrator access to the Google product(s) you want to configure; A consent solution or cookie banner on your website that is compatible with Google's consent mode API or gtag.js; A Google Tag Manager web container and a server container; A Google Analytics: GA4 client in the server container to receive consent data." - Google Developers
If you're tracking Google Ads or Floodlight conversions, don’t forget to add a Conversion Linker tag in the server container. This ensures conversions are tracked properly when consent is granted. Also, review your Content Security Policy (CSP) to confirm that the server container URL is allowed for img-src, connect-src, and frame-src directives. These steps lay the groundwork for configuring and validating consent mode.
Configuring Consent Mode in Google Tag Manager
Once you've completed the prerequisites, you can configure consent mode in GTM. Start by enabling Consent Overview in your GTM web container under Admin > Container Settings.
Next, install your CMP tag from the Community Template Gallery. Options like Cookiebot, OneTrust, and Usercentrics offer pre-built templates to streamline the process. Set this tag to fire on the Consent Initialization – All Pages trigger. This ensures consent settings are established before any other triggers fire.
"The Consent Initialization trigger is designed to help you ensure that all consent settings are honored before any other triggers fire." - Google Tag Manager Help
Create Consent State variables for each parameter - ad_storage, analytics_storage, ad_user_data, and ad_personalization. Then, create a Google Tag: Event Settings variable to map these consent states as event parameters. Attach this variable to your main Google Tag to ensure consent signals are sent with every HTTP request to the server container.
For asynchronous CMPs, set the wait_for_update parameter to 500ms in your default consent command. This ensures tags don’t fire before the CMP communicates the user's choice. To comply with regional regulations like GDPR, set default consent states to "denied" for GDPR regions (such as the EEA) and "granted" for other areas.
Integrating Consent Management Platforms
Your CMP plays a vital role in communicating user preferences to Google's tags. These tags then pass the consent parameters to the server container via HTTP requests. The GA4 client in your server container processes these signals and makes them available for your tags.
To simplify integration, use GTM templates from partner CMPs like Cookiebot, Usercentrics, or OneTrust. These templates support Consent Mode v2 and eliminate the need for custom coding.
For GDPR-compliant tracking, enable Advanced Consent Mode. This allows tags to load even when consent is denied by sending cookieless pings. These pings support behavioral and conversion modeling in GA4. If ad_storage is denied, enable URL passthrough to maintain measurement accuracy by passing ad click data (like a GCLID) through URL parameters instead of cookies.
Finally, use GTM Preview mode to verify that consent parameters - such as Google Consent Status (gcs) - are correctly appended to outgoing server-side requests. This ensures proper communication between the CMP and your tags. Test everything thoroughly in GTM Preview mode before finalizing the setup.
Managing Consent for Non-Google Tags
When working with server-side tagging for non-Google tags, enforcing consent requires manual configuration.
Custom Consent Parameters for Third-Party Tags
Unlike Google tags, third-party tags such as Facebook, Pinterest, and LinkedIn lack built-in consent mode. To ensure these tags respect user preferences, you need to configure them manually. In a server-side tagging setup, your Consent Management Platform (CMP) gathers user consent choices, which are then passed to the server container as HTTP request parameters. The parameter x-ga-gcs encodes consent states using the format G1xy. Here, the digit after "G1" represents ad_storage, and the final digit represents analytics_storage ('1' for granted, '0' for denied).
To process this data in your server container, create a User-Defined Variable of type Event Data and use x-ga-gcs as the Key Path. This variable will extract the consent string from incoming GA4 requests, allowing you to use it in your triggers.
Here's how the x-ga-gcs values translate consent states:
| gcs Parameter Value | ad_storage (Targeting) | analytics_storage (Analytics) |
|---|---|---|
| G100 | Denied | Denied |
| G101 | Denied | Granted |
| G110 | Granted | Denied |
| G111 | Granted | Granted |
By extracting the x-ga-gcs value, you can determine whether consent has been granted for ad_storage and analytics_storage. This data is essential for creating tailored triggers for third-party tags.
Creating Server-Side Triggers for Third-Party Tags
Once you've set up the consent variable, you can create custom triggers to block tags when the necessary consent is not provided. For example:
- To block tags when
ad_storageconsent is denied, configure a trigger that activates when thex-ga-gcsvariable matches the regexG(100|101). - To block tags when
analytics_storageconsent is denied, use the regexG(100|110).
Apply these blocking triggers to your third-party tags by editing the tag settings. In the Triggering section, click Add exception to ensure the tag won't fire unless the required consent is granted. Additionally, some community-developed templates, like those from Stape, offer built-in options such as "Send data only if marketing consent is given", which can simplify this process.
"Server-side processing can't be blocked or modified by browser settings or ad blockers." - Secure Privacy
Testing and Validating Consent Mode Implementation
To ensure your consent setup works as intended, use Google Tag Assistant (GTM Preview mode). This tool helps debug consent flows by showing whether the default consent state is properly set before tags fire and whether these states update correctly after users interact with your cookie banner.
Using GTM Preview Mode to Debug Consent Flows
Start by opening GTM Preview mode on your website. In the Summary panel, locate the earliest "Consent" event to review your default settings. The Consent tab provides a side-by-side view of "On-page Default" and "On-page Update" values for each consent type. For GDPR compliance, ensure that ad_storage, ad_user_data, ad_personalization, and analytics_storage are set to "denied" before any other tags fire.
Next, click "Accept" on your cookie banner and review the most recent "Consent" event. The "On-page Update" column should now display "Granted". If an error appears in Tag Assistant indicating that a tag read cookies before the default was set, adjust your setup. Move the consent default code higher in the page's script hierarchy or ensure your Consent Management Platform (CMP) tag uses the Consent Initialization trigger.
For server-side validation, use the server container's Preview mode. Check an incoming HTTP request in the Request tab to confirm that gcs and gcd parameters are being passed from the browser to the server. In the Event Data section, verify that your GA4 Client has correctly parsed these consent signals into an event object for your server-side tags. Finally, review the Tags tab to see whether tags were "Fired" or "Blocked" based on the consent status. These steps confirm that your consent settings are functioning as intended.
Once event data is verified in GTM, you can move on to monitoring ongoing consent data for long-term compliance.
Monitoring and Analyzing Consent Data
Activate the Consent Overview feature in GTM by navigating to Admin > Container Settings. This feature provides insights into which consent checks are configured versus unconfigured. If you're running Google Ads, check the Diagnostics tab within your conversion actions to confirm whether consent mode is active. Note that Google requires at least 700 ad clicks over a 7-day period for a specific domain and country grouping before conversion modeling begins. Once this threshold is met, Google will provide uplift data over a 4-week period to help you assess how consent mode impacts your campaigns.
To test region-specific consent defaults, use Chrome Developer Tools to simulate different geographic locations. For example, stricter settings should apply within the European Economic Area. Inspect network requests for gcs and gcd parameters to confirm that data is being transferred correctly.
Conclusion and Key Takeaways
This guide highlights how combining consent mode with server-side tagging ensures GDPR-compliant data management while maintaining robust data quality. By adopting a privacy-focused measurement system, you gain control over what data leaves your domain and where it goes. As Google explains, "With server-side tagging, an additional layer of control is inserted between the user and the marketing vendor. This layer allows you to control the exact composition of data that the vendors receive".
One standout feature is the advanced consent mode implementation. By setting tags to load with "denied" defaults, they send cookieless pings that support accurate conversion modeling. This approach ensures GDPR compliance while still preserving critical conversion data. Additionally, the system minimizes exposure to personally identifiable information (PII) by automatically deleting IP addresses when consent is denied.
Server-side tagging further strengthens data security by keeping processing within a first-party context. This setup allows you to redact sensitive details, such as PII or IP addresses, before transmitting any data to third-party vendors. With a single, controlled data stream, you gain full visibility into what’s being collected and where it’s sent.
To future-proof your data infrastructure, consider configuring region-specific defaults using ISO 3166-2 codes - stricter for the EEA and more relaxed for other regions - to maintain measurement accuracy. Use the Consent Initialization trigger to ensure default states are properly set before tags fire, and rely on GTM Preview mode to confirm that consent signals are correctly passed from your web container to your server container.
This strategy not only aligns with GDPR requirements but also simplifies long-term data management. While the initial setup requires effort, it delivers ongoing compliance and ensures conversion insights remain intact, adjusting seamlessly to each user's consent preferences.
FAQs
Do I need both a GTM web container and a server container?
To ensure compliance with GDPR requirements, you need both a web container and a server container. The web container is responsible for collecting user consent, while the server container processes the data and activates tags based on that consent. Together, they make consent mode work seamlessly with server-side tagging.
What’s the difference between Basic and Advanced Consent Mode?
Basic Consent Mode ensures that all Google tags are blocked until users explicitly grant their consent. This approach is designed to meet the strict requirements of privacy laws like GDPR, making it ideal for businesses prioritizing full compliance.
On the other hand, Advanced Consent Mode allows Google tags to load with default settings initially. It then dynamically adjusts based on the user's consent choices. This mode provides more flexibility, making it easier to address data gaps while still respecting user preferences.
In summary, Basic Consent Mode is perfect for strict compliance, while Advanced Consent Mode offers a balanced approach for managing data and user consent.
How do I stop non-Google server-side tags from firing without consent?
To make sure non-Google server-side tags don't fire without user consent, it's essential to integrate consent management into your server-side tagging setup. Use consent mode APIs such as updateConsentState and setDefaultConsentState to handle consent signals dynamically. Configure your server container to respect these signals and set up consent checks for all tags, ensuring they only activate when the required consent has been provided.
Explore the six basics
Every Clunky AI article maps back to one or more of the questions a business site has to answer.
Related Posts
Tags PerformancePrivacyUser Experience
Category Website Compliance