Checklist for Accessibility-First Website Overhauls
1/12/2026 • 12 min read
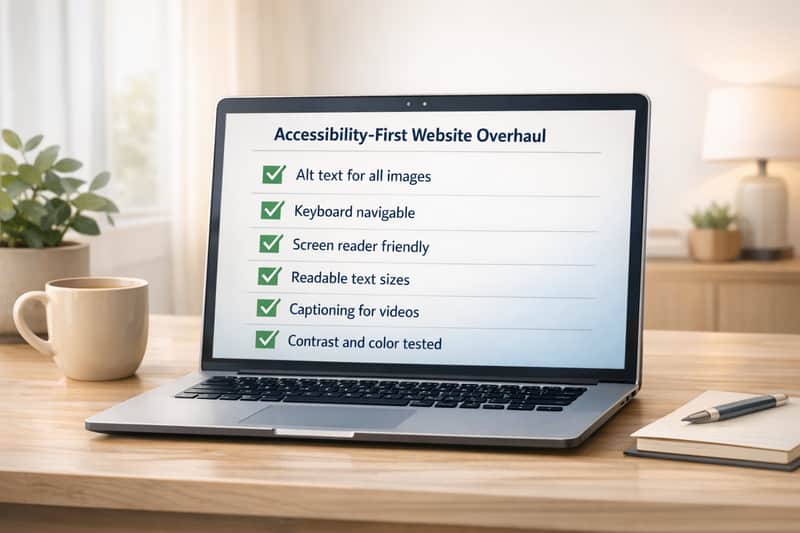
Checklist for Accessibility-First Website Overhauls
Making your website accessible isn’t just about compliance - it’s about creating a better experience for everyone while avoiding costly lawsuits. 88% of websites fail accessibility standards, and with lawsuits averaging $100,000, it’s clear accessibility is a must. Following the Web Content Accessibility Guidelines (WCAG 2.1/2.2) ensures your site meets legal requirements and addresses common barriers like color contrast, keyboard navigation, and screen reader compatibility.
Here’s how to make accessibility a priority during a website redesign:
- Understand Legal Standards: Follow WCAG 2.1/2.2 Level AA and ADA requirements. For government sites, check Section 508 compliance.
- Assign Clear Roles: Involve designers, developers, and QA testers to integrate accessibility at every step.
- Audit Your Current Website: Use tools like CLUNKY.ai's dCLUNK™ for automated scans, but pair them with manual tests.
- Focus on Key Principles: Ensure content is perceivable (alt text, captions), operable (keyboard-friendly), understandable (logical structure), and robust (semantic HTML).
- Test and Maintain: Use screen readers, keyboard navigation, and regular audits to catch and fix issues.
Accessibility isn’t a one-time task - it’s an ongoing process. Prioritize it now to avoid risks, expand your audience, and improve usability for all.
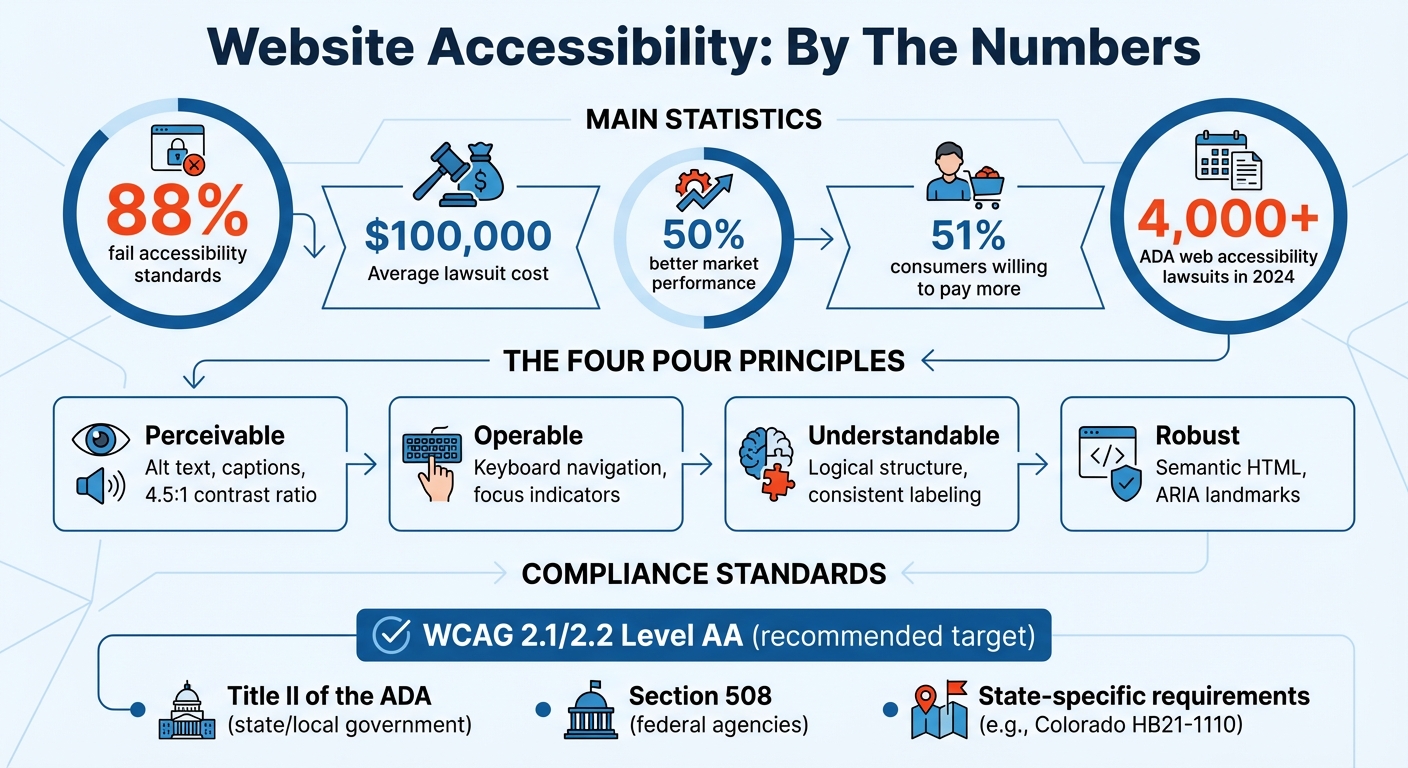
Website Accessibility Statistics and Compliance Requirements
Planning Your Accessibility-First Redesign
Define Legal and Compliance Requirements
Start by identifying the accessibility laws that apply to your website. For state or local governments, Title II of the ADA is likely relevant. Federal agencies, on the other hand, must adhere to Section 508 of the Rehabilitation Act, which was updated in January 2018 to align with WCAG 2.0 Level A and AA success criteria. Some states have their own specific rules - for instance, Colorado's HB21-1110 outlines clear requirements for businesses operating within the state.
Next, choose the WCAG version your redesign will follow. As of October 2023, WCAG 2.2 is the latest standard. It builds on WCAG 2.0 and 2.1 while adding six new criteria aimed at addressing cognitive and motor disabilities. Since WCAG 2.2 is backwards compatible, any work done to meet earlier versions remains valid. Most organizations should aim for WCAG 2.1 or 2.2 Level AA, as this level is widely regarded as best practice and tackles the most common accessibility barriers. Level A represents the bare minimum, while Level AAA is typically reserved for highly specific use cases.
"The generally accepted target for accessibility is the latest version of Web Content Accessibility Guidelines (WCAG) Level AA." – W3C Web Accessibility Initiative
Once you've defined your legal and compliance requirements, ensure these standards are integrated into every stage of your redesign by assigning clear roles and responsibilities.
Assign Team Roles and Responsibilities
Creating an accessible website requires contributions from every team member. Here's how different roles can contribute:
- UX designers: Plan tab order and focus states to ensure smooth navigation.
- Visual designers: Verify color contrast meets standards and that focus indicators are easy to spot.
- Content authors: Write effective alt text and craft logical heading structures.
- Developers: Use semantic HTML and implement ARIA roles appropriately.
- QA testers: Identify and track accessibility issues during testing.
Document these responsibilities in job descriptions and provide training as needed. Assign a primary owner for each area to lead the work, while identifying contributors who will support them. Don’t overlook your procurement team - they play a vital role in evaluating third-party plugins and tools to confirm they meet your accessibility standards before purchase.
Audit Your Current Website
Begin with an accessibility audit to identify issues and establish a baseline for improvement. Tools like CLUNKY.ai's dCLUNK™ can help detect common problems such as missing alt text, insufficient color contrast, and keyboard navigation issues. However, automated scans alone aren’t enough.
"WAVE and other automated tools can only identify some accessibility issues. You should also test the page with a keyboard, screen reader, and/or browser developer tools." – WebAIM
Pair automated scanning with manual testing using a keyboard and screen reader to catch issues that tools might miss. Focus your audit on high-traffic pages and critical user paths, such as registration, search, or checkout. Prioritize problems based on their impact - fixing issues on your homepage or global navigation should come first since they affect the most users. Also, look for quick wins: simple fixes that can deliver immediate improvements.
sbb-itb-641714f
Designing and Writing Accessible Content
Make Content Perceivable
To ensure accessibility, every non-text element needs a text alternative. For images, use alt text to describe their content or function. If an image is purely decorative, assign an empty alt attribute (alt="") so screen readers can skip it. For media, provide captions for videos with audio and transcripts for audio-only files. Videos should also include audio descriptions or a detailed transcript that explains important visual elements.
Contrast is another key factor. Text must have a contrast ratio of at least 4.5:1 against the background to meet Level AA standards. For larger text - 18pt or larger, or 14pt bold - the minimum contrast ratio is 3:1. Avoid relying solely on color to convey meaning, as this can exclude users who are colorblind or using monochrome displays. Instead, pair colors with icons, labels, or patterns to communicate effectively.
"Information and user interface components must be presentable to users in ways they can perceive." – W3C Recommendation
Content should remain readable when zoomed to 200% and reflow properly without horizontal scrolling at 400% zoom (320px width). Use semantic HTML tags like <h1> to <h6> for headings and <nav>, <main>, and <footer> for page regions to help screen readers interpret the structure. For forms, associate inputs with descriptive <label> elements using for and id attributes, and add the autocomplete attribute for fields collecting user information.
Enable Keyboard and Interactive Access
Once content is perceivable, make sure all interactive elements are fully operable using just a keyboard. Buttons, links, form fields, and menus should all respond to keyboard commands. Use <button> for actions and <a> with an href attribute for navigation, as these are naturally keyboard-friendly. Ensure the focus order follows a logical sequence that matches the visual layout, and avoid trapping users in specific areas.
A visible focus indicator with at least a 3:1 contrast ratio is essential. Add "skip links" at the top of pages to let users bypass repetitive navigation and jump directly to the main content. When opening modals or dialogs, move focus inside them and trap it there until they're closed. Once dismissed, return focus to the element that triggered the modal. Always allow users to close overlays like menus or tooltips by pressing the Esc key.
| Key/Action | Interaction |
|---|---|
| Tab | Move focus to the next interactive element |
| Shift + Tab | Move focus to the previous interactive element |
| Enter | Activate links, buttons, or submit forms |
| Spacebar | Toggle checkboxes, activate buttons, or expand select menus |
| Arrow Keys | Navigate within radio groups, sliders, or tab lists |
| Esc | Close or collapse menus, dialogs, and tooltips |
Build Clear and Predictable Interfaces
Consistency and clarity are crucial for an accessible interface. Use nested HTML headings (<h1> to <h6>) to organize content logically. Repeated components like navigation menus should always appear in the same relative order across all pages, and elements with identical functionality must have consistent labeling throughout the site.
Avoid instructions that rely solely on visual cues like shape, size, or position. For example, phrases like "click the square icon" or "check the right-hand column" are unhelpful for users relying on screen readers.
Inputting data or changing focus should not trigger unexpected actions, such as pop-ups or form submissions, unless users are informed beforehand. Ensure the reading and navigation order in your code aligns with the visual layout and feels intuitive. Use ARIA landmarks like header, main, footer, and nav to define page regions. Provide descriptive page titles or breadcrumbs to help users understand their location within the site. For forms, group related fields with <fieldset> and <legend> tags, and programmatically mark required fields using aria-required.
Building and Testing Accessibility
Write Accessible Code
To make your website truly inclusive, your code should uphold accessibility standards. Start with semantic HTML as the backbone of your structure. Use heading tags (<h1> through <h6>) in a logical, descending order to create a clear document outline. Add landmark elements like <nav>, <main>, <header>, and <footer> so assistive technologies can easily interpret your page layout. Don’t forget to include a lang attribute in the <html> tag (e.g., <html lang="en">) to help screen readers pronounce text correctly.
Forms are another critical area. Always associate input fields with their corresponding <label> using matching for and id attributes. Group related form controls with <fieldset> and <legend> tags for better context. For images, provide meaningful alt text for visuals that convey information, and use an empty alt="" for decorative images.
Avoid practices that can create barriers. For instance, stick to tabindex values of 0 or -1 to maintain a logical navigation order - positive values can disrupt the flow. Similarly, avoid autoplaying media, as it can overwhelm users with cognitive disabilities or interfere with screen readers. Lastly, validate your HTML regularly to ensure consistent behavior across browsers and assistive technologies. Clean, valid HTML is a cornerstone of accessibility.
Test with Multiple Methods
Once your code is written, it’s time to test its accessibility. Automated tools can quickly flag common issues, such as missing alt attributes, poor color contrast, or duplicate IDs. These tools are fast and repeatable, making them ideal for catching errors early. However, they can’t catch everything - like whether your alt text is descriptive enough or if your heading structure makes sense.
That’s where manual testing comes in. Use just your keyboard to navigate your site: press Tab to move forward, Shift+Tab to go back, Enter to activate links and buttons, and Esc to close pop-ups. Make sure every focusable element has a visible outline and meets contrast standards. Also, test your site at 200% zoom to check readability and at 400% zoom (about 320 pixels wide) to ensure content reflows properly without horizontal scrolling.
For deeper insights, try navigating your site with assistive technologies like JAWS, NVDA, or VoiceOver. These tools simulate how users with visual impairments experience your site. As WebAIM advises:
"WAVE and other automated tools can only identify some accessibility issues. You should also test the page with a keyboard, screen reader, and/or browser developer tools."
Finally, involve users with disabilities in your testing process. They can provide invaluable feedback on real-world usability challenges.
Set Up Regular Accessibility Checks
Even after your site is accessible, maintaining that standard is an ongoing effort. Accessibility isn’t a one-and-done task - small updates, like adding a blog post or tweaking a layout, can introduce new barriers. In 2024 alone, over 4,000 web accessibility lawsuits were filed under the ADA, with defense costs often running tens of thousands of dollars, even for minor cases.
To avoid these risks, schedule regular audits. Conduct a full accessibility review at least once a year and after any significant redesigns or new feature launches. Automated monitoring tools, like the WAVE browser extension, can help you catch regressions in real time. Focus on fixing issues that affect multiple pages (such as navigation) or critical functions (like checkout forms).
Greg McNeil from 216digital highlights this ongoing need:
"Accessibility isn't something you fix once and forget. As your site evolves, even small changes can introduce new issues."
To stay proactive, integrate accessibility checks into your development workflow. Use automated linters and testing APIs within your CI/CD pipeline to catch issues before they go live. This approach ensures your team stays on track with accessibility standards as they evolve.
How to Run an Accessibility WCAG Audit: Step-by-Step for Beginners
Conclusion and Next Steps
Revamping a website with accessibility in mind isn’t a one-and-done task - it’s an ongoing commitment. Throughout this checklist, the POUR principles - Perceivable, Operable, Understandable, and Robust - have been your guide to creating an inclusive design. From using semantic HTML and ensuring keyboard navigation to maintaining consistent interfaces and conducting regular testing, these principles lay the groundwork for accessibility. But the work doesn’t stop at launch. As web developer Steve Gerencser aptly puts it:
"Accessibility is not an easily achievable end, it is an ongoing process and must be constantly tested and improved."
Accessibility isn’t just about compliance or avoiding legal risks - it’s also a smart business move. Websites that meet accessibility standards outperform their competitors by 50% in market performance. Even more compelling, 51% of consumers are willing to pay more to brands that prioritize accessibility. Regular monitoring and improvements are essential to maintaining these standards and reaping the long-term benefits.
Tools like CLUNKY.ai's dCLUNK™ scanner can help by identifying critical UX and accessibility issues, such as missing alt text, poor color contrast, or inaccessible forms, while offering actionable fixes for WCAG compliance gaps. However, automated tools alone aren’t enough. Pair these scans with manual tests - like using a keyboard or screen reader - to catch issues that automation might miss. Continuous monitoring is the real key to ensuring accessibility over time.
Post-launch, make accessibility a routine part of your workflow. Schedule regular audits (at least once a year), run automated checks for new content, and clearly assign responsibilities within your team. Prioritize fixing issues on high-traffic pages and crucial features like checkout forms. As The A11Y Project wisely reminds us, "There is no such thing as 'perfect accessibility' or a site being '100% accessible.' You should be wary of companies and services that make such promises."
Accessibility is a journey of constant improvement. Use the steps outlined in this checklist as your starting point, commit to ongoing testing, and integrate accessibility into every phase of your development process. It’s not just an afterthought - it’s the foundation of a better web for everyone.
FAQs
What are the benefits of making your website accessible beyond meeting legal requirements?
Making your website accessible isn’t just about ticking off a legal requirement - it’s about unlocking opportunities for growth. By making your site accessible, you can connect with a broader audience, including people with disabilities, older adults, mobile-only users, and even those with slower internet speeds. This expanded reach can translate into more visitors and higher engagement.
Accessibility also plays a big role in SEO success. Features like clear headings, alt text, and ARIA labels align perfectly with search engine guidelines. This can boost your site’s visibility, helping you rank higher, attract more organic traffic, and ultimately drive conversions. Plus, a site that’s easy to navigate benefits everyone, leading to lower bounce rates, longer visits, and more sales or sign-ups.
On top of the practical perks, focusing on accessibility can elevate your brand. Companies that prioritize inclusive design are often viewed as socially responsible and trustworthy, which can foster customer loyalty and set you apart from competitors. Tools like CLUNKY.ai make it easier to identify and fix accessibility and usability issues, ensuring your site delivers a great experience for all users while keeping you compliant with legal standards.
How can I include accessibility testing in my website redesign process effectively?
To make accessibility a core focus during your website redesign, it's crucial to integrate testing throughout the entire development process. Start by setting clear accessibility objectives based on WCAG 2.x and ADA standards, and designate team members to monitor and ensure compliance. Use automated tools like CLUNKY.ai’s dCLUNK™ scanner to identify and fix issues related to accessibility, performance, and user experience early in the process. Pair these tools with manual testing methods, such as checking keyboard navigation, evaluating screen reader compatibility, and verifying color contrast.
Before your site goes live, review it against a detailed accessibility checklist to confirm it meets the necessary standards. Build accessibility checks into your development workflow so you can catch and address errors in real time. Additionally, plan for regular reviews after the launch to ensure your site remains compliant over time. This consistent, proactive effort will help create a website that is inclusive and welcoming to all users.
Who should be involved in making a website redesign accessible?
Creating a website that prioritizes accessibility during a redesign takes a well-coordinated team with clearly defined roles. Here’s a breakdown of the key players and their responsibilities:
- Project Manager: Oversees the project to ensure accessibility is part of the scope, timeline, and budget from start to finish.
- Accessibility Lead: Acts as the go-to person for accessibility guidelines, driving the team to meet WCAG and ADA standards.
- UX/UI Designer: Focuses on creating user-friendly interfaces that everyone can perceive, navigate, and understand.
- Front-End Developer: Writes clean, semantic code, incorporates ARIA roles, and ensures smooth keyboard navigation.
- Content Author: Crafts clear, concise text and provides accurate alt-text and captions for multimedia elements.
- Quality Assurance Tester: Performs both manual and automated testing to identify and address accessibility issues.
- Compliance Officer: Reviews the final product to confirm it meets ADA and other legal accessibility requirements.
When these roles collaborate effectively, they can deliver a redesign that ensures an inclusive and accessible experience for all users.
Explore the six basics
Every Clunky AI article maps back to one or more of the questions a business site has to answer.
Related Posts
Tags AccessibilityPerformanceUser Experience
Category Website Compliance